Roll Lower Back (Side) Lying On Floor
The Roll Lower Back (Side) Lying on Floor exercise helps improve lower-back mobility and reduce tension through controlled side-to-side rolling.


Roll Lower Back (Side) Lying On Floor
Muscles Worked: Roll Lower Back (Side) Lying On Floor
The Roll Lower Back (Side) Lying On Floor mainly works the muscles along your lower back, especially the erector spinae. In this move, those muscles are not lifting heavy weight; they are being pressed and gently lengthened as you roll, which can help reduce stiffness and make the area feel less tight. Your abs and side muscles help you stay steady so you do not twist too far while the roller moves under you. You should feel mild pressure and a loosening effect, not sharp pain, and focused trunk work is often used to improve how the lower back handles movement and support.
Technique and form
How to perform the Roll Lower Back (Side) Lying On Floor
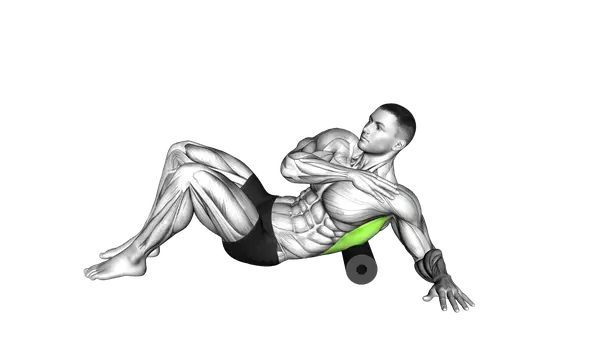
- Lie on your side on a floor mat with your knees bent at approximately 90 degrees and your arms extended in front of your chest for balance.
- Stack your hips, shoulders, and ankles in a straight line, keeping your head neutrally aligned with your spine.
- Engage your core by drawing your navel toward your spine while maintaining a natural curve in your lower back.
- Inhale to prepare, then exhale as you slowly roll your pelvis and lower back backward, creating a slight rotation in your spine.
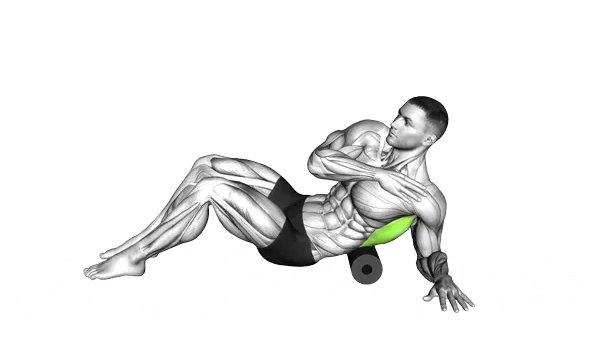
- Control the movement using your obliques and deep core muscles, ensuring your shoulders remain relatively stable.
- Roll only as far as you can maintain proper form, focusing on the articulation of each vertebra rather than the range of motion.
- Inhale as you pause briefly at the end range, then exhale as you return to the starting position with control.
- Perform all repetitions on one side before switching to the opposite side, maintaining consistent breathing throughout.
Important information
- Keep your top shoulder from collapsing forward during the movement to prevent excessive thoracic rotation.
- If you feel any pinching in your lower back, reduce the range of motion and focus on more subtle movements.
- Place a small folded towel under your waist if you feel discomfort in your bottom hip bone.
- Ensure you're moving from your core and not just swinging your legs to generate momentum.
Does the Roll Lower Back (Side) Lying On Floor improve flexibility?
Yes. The Roll Lower Back (Side) Lying On Floor can help improve flexibility and day-to-day comfort by reducing the feeling of tightness around the lower back, but it is a mobility drill, not a muscle-building exercise. Research on trunk training shows that focused core work can improve how the muscles around your midsection support and control the spine, which is useful when you are trying to move more freely without feeling stiff.
- Targets a hard-to-reach area — Lying on your side changes the pressure so the roller can reach the muscles along one side of your lower back more directly than a flat-on-your-back position. That makes it useful when one side feels tighter than the other.
- Helps you relax into the position — Because the drill is low effort, you can breathe slowly and let the area soften instead of bracing hard. That usually makes the stretch feel better and helps you move with less guarding afterward.
- Good before or after training — Use it before lifting if your lower back feels stiff and you want easier movement, or after training to calm the area down. It pairs well with simple stability work like the Side Plank if you also need better control.
- Works best with strength support — Mobility lasts longer when the muscles around the spine can also hold good position. Core-focused training has been shown to improve trunk muscle function, so this drill works best as part of a plan that also includes controlled support work rather than rolling alone. You can also combine it with Roll Upper Back if your whole back feels stiff.
Programming for flexibility
Do 2-4 sets per side of 20-45 seconds, resting 20-30 seconds between sides. Use it 3-7 days per week depending on how stiff you feel, and keep the pressure light to moderate so the muscles relax instead of tensing up. Shorter holds work well in a warm-up, while longer holds fit better after training or on recovery days.
Alternative Exercises


Built for progress
Take the guesswork out of training
Create personalized AI-powered workout plans that evolve with you. Train smarter, track every rep and keep moving forward, one workout at a time.


FAQ - Roll Lower Back (Side) Lying On Floor
This exercise primarily targets the erector spinae muscles that run alongside your spine while engaging your core stabilizers and obliques. The gentle rolling motion also helps release tension in the quadratus lumborum and promotes mobility through the thoracolumbar fascia.
You can safely perform this exercise 3-4 times weekly, either as part of your warm-up or cool-down routine. It's particularly beneficial after intense upper body training sessions or on recovery days to maintain shoulder health and function.
This gentle mobility exercise is generally safe for those with minor back discomfort, but always move within a pain-free range. If you have diagnosed back conditions, herniated discs, or acute pain, consult with a healthcare professional before attempting this or any back exercise.
The most common mistakes include rushing through the movement, using momentum instead of controlled motion, and forcing rotation beyond your comfortable range. Keep the movement slow and deliberate, breathe throughout the exercise, and never push through sharp or shooting pain.
To increase the intensity, extend your arms further from your body to create a longer lever or hold briefly at points of tightness. For a gentler approach, keep your knees more bent and arms closer to your body, or place a small pillow under your head for neck support.

Roll Lower Back (Side) Lying On Floor
Thank you for your feedback!
Thank you for your feedback!