Foam Roll Upper Back
The Foam Roll Upper Back helps release tension in the upper back and shoulders, improving mobility and posture.


Foam Roll Upper Back
Muscles Worked: Foam Roll Upper Back
Foam Roll Upper Back mainly targets the upper back, especially the traps and lats, because those tissues are compressed and lengthened as your thoracic spine moves over the roller. The traps often hold excess tone from shrugging and desk posture, while the lats can limit overhead shoulder motion when they stay stiff. The shoulders and rib cage move more freely when you keep your ribs down and let the roller contact the mid-to-upper back instead of the low back.
Technique and form
How to perform the Foam Roll Upper Back
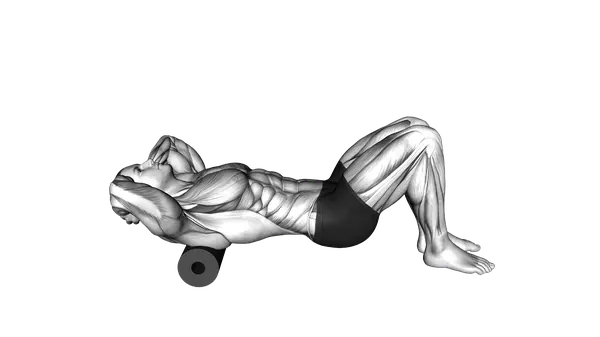
- Lie on your back with your knees bent and feet flat on the floor, placing a foam roller horizontally under your upper back, just below your shoulder blades.
- Cross your arms over your chest or place your hands behind your head for support, keeping your core engaged to stabilize your lower back.
- Lift your hips slightly off the ground to shift your weight onto the foam roller and upper back area, maintaining a neutral neck position.
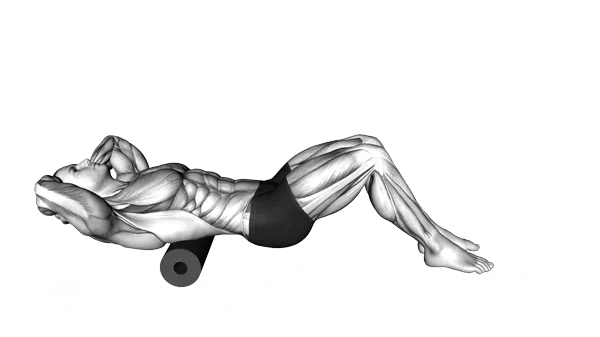
- Breathe in deeply, then as you exhale, slowly roll your body up, moving the foam roller a few inches toward your neck.
- Continue rolling until the foam roller reaches the base of your neck, being careful not to roll directly onto your neck or head.
- Inhale as you reverse the movement, slowly rolling back down until the foam roller reaches the middle of your back again.
- Maintain tension in your core throughout the exercise to protect your lower back, and keep your feet planted firmly on the ground for stability.
- Perform the rolling motion slowly and with control, pausing briefly on any tight or tender areas to allow the muscles to release.
Important information
- Keep your buttocks off the ground but not lifted too high—maintain a slight elevation to ensure pressure on the foam roller.
- If you experience any sharp pain (rather than the normal discomfort of releasing tension), adjust your position or decrease pressure by supporting more weight with your feet.
- Avoid rolling directly on your spine by slightly shifting your weight from side to side if needed.
- For beginners, use a softer foam roller; as you progress, you can switch to a firmer roller for deeper tissue release.
Does the Foam Roll Upper Back improve flexibility?
Yes. Foam Roll Upper Back can improve flexibility and mobility, especially if tight upper-back and lat tissue is limiting thoracic extension, shoulder flexion, or comfortable overhead positioning. It is not a muscle-building exercise, but it can make strength work feel smoother by improving how the upper back and shoulders move together.
- Thoracic extension access — Rolling the upper back helps you find extension through the thoracic spine, which matters for overhead lifting, front rack positions, and posture under load. If the upper back stays stiff, the neck and lower back often compensate instead.
- Lat tissue quality — Because the lats attach into the upper arm and influence shoulder motion, reducing stiffness here can make overhead reaching and pressing feel less restricted. That makes this drill a useful prep before movements like the Resistance Band Seated Row or overhead training.
- Low fatigue mobility work — With a fatigue level of 2, this drill fits well in warm-ups, recovery sessions, or between strength sets. You can improve range of motion without creating soreness that interferes with heavier back training.
- Better position awareness — The roller gives immediate feedback on where your upper back is moving and where it is staying rigid. That body awareness helps you separate thoracic motion from lumbar overextension, which is the main technical mistake in this exercise family.
Programming for flexibility
Do 2-4 sets of 20-40 seconds of slow rolling or 6-10 controlled passes across the upper back, resting 20-30 seconds between sets. Use it 4-7 days per week if upper-back stiffness is chronic, or place it in your warm-up before upper-body sessions. Move slowly, pause on tight areas for 1-2 breaths, and stop before the roller drifts into the lower back.
Alternative Exercises


Built for progress
Take the guesswork out of training
Create personalized AI-powered workout plans that evolve with you. Train smarter, track every rep and keep moving forward, one workout at a time.


FAQ - Foam Roll Upper Back
The Roll Upper Back primarily targets the trapezius muscles and rear deltoids while also addressing tension in the thoracic spine region. This recovery technique helps release tightness that builds up from daily activities like desk work or training sessions.
Position a foam roller perpendicular to your spine at mid-back level, support your head with your hands, and keep your glutes on the ground. Gently roll up and down between your mid-back and base of your neck, pausing on tender spots for 20-30 seconds before continuing.
Incorporate this exercise into your cool-down routine 2-4 times per week, especially after workouts that involve pushing movements or shoulder work. Daily rolling can be beneficial if you experience significant upper back tightness from prolonged sitting or stress.
Yes, regular practice of the Roll Upper Back can significantly improve posture by counteracting the forward-rounded shoulder position common in our digital lifestyle. By releasing tension in the trapezius and activating the rear deltoids, you create better muscular balance that supports proper spinal alignment.
Avoid rolling directly on your spine or neck vertebrae—stay on the muscular tissue alongside the spine. Don't rush through tender areas; instead, breathe deeply and allow the tissue to release. Finally, don't apply excessive pressure that causes sharp pain rather than the productive discomfort of myofascial release.
Foam Roll Upper Back
Thank you for your feedback!
Thank you for your feedback!