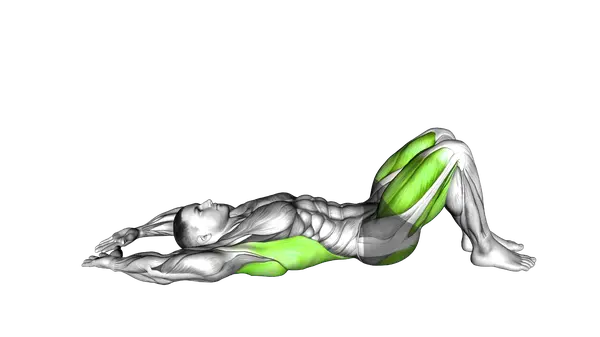
Pelvic Tilt Into Bridge
Reviewed by Dylan Maurick, Physiotherapist
The Pelvic Tilt Into Bridge is a controlled core and glute exercise that builds strength, stability, and proper hip extension through a smooth, coordinated movement.


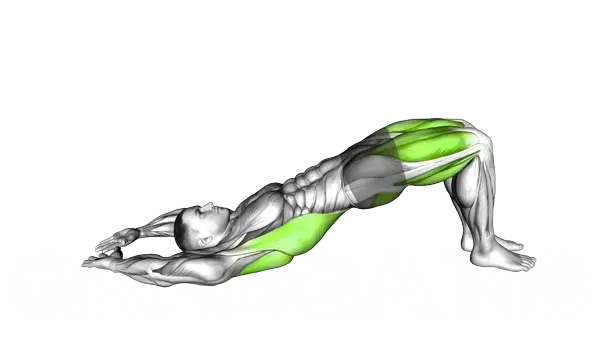
Pelvic Tilt Into Bridge
Muscles Worked: Pelvic Tilt Into Bridge
The Pelvic Tilt Into Bridge mainly works your glutes, which drive the lift as you raise your hips off the floor. Your hamstrings help finish the bridge, while your abs help tuck your hips and keep your lower back from taking over. That hip-tuck matters here because better pelvic tilt control during bridge variations can increase glute work and change how much the hamstrings join in (Jang et al., 2024).
Technique and form
How to perform the Pelvic Tilt Into Bridge
- Lie on your back with your knees bent, feet flat on the floor hip-width apart, and arms at your sides with palms facing down.
- Engage your core muscles by drawing your navel toward your spine while maintaining a natural breathing pattern.
- Begin with a pelvic tilt by pressing your lower back into the floor and slightly tilting your pelvis upward, exhaling during this movement.
- Maintain the pelvic tilt position as you inhale to prepare, then exhale as you press through your heels to lift your hips off the floor.
- Raise your hips until your body forms a straight line from your shoulders to your knees, keeping your weight distributed across your shoulders and feet.
- Squeeze your glutes at the top position while keeping your core engaged and your ribs drawn down to prevent excessive arch in your lower back.
- Hold the bridge position for 1-2 seconds at the top while continuing to breathe normally, ensuring your knees stay hip-width apart.
- Lower your body back to the floor vertebra by vertebra in a controlled manner, inhaling as you descend, and then release the pelvic tilt to return to the starting position.
Important information
- Keep your feet flat on the ground throughout the entire movement to maintain stability and proper force production.
- Avoid overextending at the top position by keeping your ribs down and maintaining the connection between your core and glutes.
- If you feel any discomfort in your lower back, focus more on the initial pelvic tilt to ensure proper positioning before lifting into the bridge.
- For beginners, start with a shorter hold at the top and gradually increase duration as strength improves.
Is the Pelvic Tilt Into Bridge good for muscle growth?
Yes. The Pelvic Tilt Into Bridge can help build your glutes, especially for beginners who need to learn how to squeeze the glutes hard without letting the lower back do the job. Research on bridge variations shows that controlling the hip tuck can raise glute activity, which makes this version useful for teaching better glute-driven reps (Jang et al., 2024).
- Better glute focus — The first part of the rep is the hip tuck, which puts your pelvis in a better spot before you lift. That usually helps you feel the glutes sooner instead of cranking through the lower back.
- Less hamstring takeover — A lot of people feel bridges mostly in the backs of their thighs. Cleaning up the pelvic tilt can shift the effort toward the glutes, which is exactly what you want if standard bridges feel awkward or crampy (Jang et al., 2024).
- Easy way to progress — Once you can own this pattern, you can move to harder bridge family options like glute bridge abduction or load it with a Dumbbell Glute Bridge. That makes this a smart starting point, not a dead end.
- Useful for low-back-friendly training — Bridge work is often used when you want to train the hips without heavy spinal loading, and recent clinical writing discusses the supine bridge as a practical option in low back-focused movement work (Colonna et al., 2025).
Programming for muscle growth
Do 3-4 sets of 10-15 reps with a 1-2 second squeeze at the top and 45-75 seconds rest. Train it 2-4 times per week. Higher reps work well here because bodyweight bridges are light, so you need more total reps and a strong squeeze to challenge the glutes enough to grow.
Pelvic Tilt Into Bridge Variations


Alternative Exercises


Built for progress
Take the guesswork out of training
Create personalized AI-powered workout plans that evolve with you. Train smarter, track every rep and keep moving forward, one workout at a time.


FAQ - Pelvic Tilt Into Bridge
The exercise primarily targets your glutes (buttocks muscles) and core, including the abdominals and lower back. It also engages your hamstrings and helps activate the entire posterior chain while improving spinal stability.
Yes, when performed correctly, the Pelvic Tilt Into Bridge is actually therapeutic for mild lower back discomfort as it strengthens supporting muscles. Start with just the pelvic tilt component if you have significant pain, and always consult your healthcare provider before beginning any exercise program.
To increase difficulty, try extending your hold time at the top of the bridge, performing the movement with one leg extended, or placing your feet on an unstable surface like a stability ball. You can also add a resistance band just above your knees to increase glute activation.
Avoid hyperextending your lower back at the top of the bridge position, which puts unnecessary strain on your spine. Don't let your knees collapse inward during the movement, and ensure you're driving through your heels rather than your toes to properly engage your glutes.
You can safely perform this exercise 3-4 times weekly, either as part of your warm-up or cool-down routine. It's particularly beneficial after intense upper body training sessions or on recovery days to maintain shoulder health and function.
Scientific References
Jang TJ, Jeon IC · Physiotherapy theory and practice (2024)
Colonna S, D'Alessandro A, Tarozzi R et al. · Cureus (2025)
Sources are peer-reviewed academic publications from PubMed.
Pelvic Tilt Into Bridge
Thank you for your feedback!
Thank you for your feedback!