

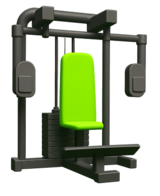

Assisted Pull-Up
Muscles Worked: Assisted Pull-Up
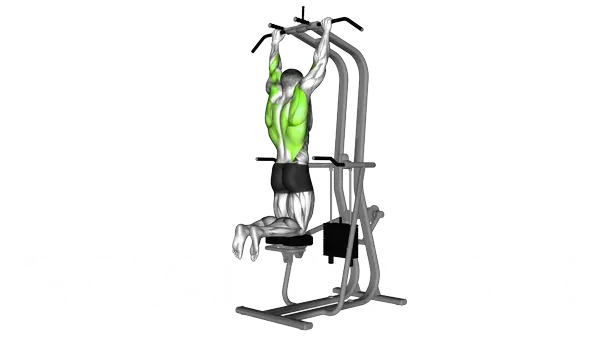
The Assisted Pull-Up mainly trains your back, with the lats producing most of the shoulder adduction and extension that pulls your body upward. Your biceps and forearms assist by flexing the elbow and maintaining grip, while the upper and middle back help control the shoulder blades through the rep. Using assistance lets beginners practice pull-up mechanics with enough volume to build strength, and keeping the scapulae moving naturally instead of shrugging hard can reduce shoulder irritation risk (Prinold et al., 2016).
Technique and form
How to perform the Assisted Pull-Up
- Attach a resistance band to a pull-up bar or set up an assisted pull-up machine. Make sure the band or platform provides enough support to complete the full movement with proper control
- Place one or both knees on the band or platform, then grip the bar slightly wider than shoulder-width apart. Keep your core tight and your shoulders pulled back.
- Begin the movement by driving your elbows down and back, pulling your chest toward the bar. Avoid letting your shoulders shrug up as you lift.
- Pause briefly at the top, keeping your chin above the bar and squeezing your back muscles.
- Lower yourself slowly and under full control until your arms are nearly straight — this eccentric phase is key for building strength.
- Repeat for 6–12 reps, adjusting band tension or machine assistance to challenge your current ability without compromising form.
Important information
- Keep your core engaged throughout the set to avoid arching your lower back.
- Control the downward phase: this is where most strength gains occur.
- Gradually reduce assistance over time to progress toward unassisted pull-ups.
- Avoid jerking movements or swinging your legs for momentum.
- Focus on leading with your elbows, not your hands, to activate the lats effectively.
Is the Assisted Pull-Up good for muscle growth?
Yes. The Assisted Pull-Up is effective for building lat and arm size because it keeps the same vertical pulling pattern as a full pull-up while reducing the load enough to accumulate quality reps and total training volume. Pull-up variations also produce high activation in the prime movers of the upper body pull, showing that they place meaningful demand on the lats and arms when you control technique and progress assistance over time (Snarr et al., 2017).
- Scalable lat tension — Assistance lets you train close to failure in a true vertical pull without losing range of motion. That matters for hypertrophy because many beginners cannot get enough hard reps with bodyweight alone, but can with an assisted machine or band.
- Better rep quality — When the load matches your strength, you can keep the elbows driving down and the chest rising toward the bar instead of turning the rep into a kick or neck reach. Cleaner scapular motion is especially important in pull-up patterns because technique changes can affect shoulder mechanics (Prinold et al., 2016).
- Useful bridge to harder pulling — The exercise builds the exact strength pattern needed for unassisted pull-ups and related moves like the lever-assisted-chin-up. As assistance decreases over time, relative loading rises without changing the movement family.
- Higher repeatable volume — Assisted pull-up work is easier to recover from than repeated maximal bodyweight attempts, which helps you accumulate more productive sets across the week. Research on weight-assisted pull-up bouts shows that recovery method influences repeated assisted pull-up performance, reinforcing the value of consistent recovery conditions when trying to sustain output across bouts (Bacon et al., 2012).
Programming for muscle growth
Do 3-5 sets of 6-12 reps with 90-150 seconds rest, 2-3 times per week. Choose an assistance level that leaves 1-2 reps in reserve while keeping full control on every rep. When you can hit the top of the rep range for all sets, reduce assistance slightly. Pairing it with a horizontal pull like resistance-band-seated-row helps build the upper back support that improves pull-up performance.

Alternative Exercises


Built for progress
Take the guesswork out of training
Create personalized AI-powered workout plans that evolve with you. Train smarter, track every rep and keep moving forward, one workout at a time.


FAQ - Assisted Pull-Up
The assisted pull-up primarily targets the latissimus dorsi (lats), rhomboids, and biceps. It also engages your rear deltoids, lower trapezius, and core muscles as stabilizers, making it an excellent compound movement for upper body development.
To make assisted pull-ups easier, increase the assistance by using a heavier counterweight on the machine or a stronger resistance band. To make them more challenging, gradually decrease the assistance until you're using just enough support to complete your target rep range with proper form.
Aim for 3-4 sets of 8-12 repetitions with sufficient assistance to maintain proper form throughout each set. As you get stronger, focus on reducing the assistance rather than increasing repetitions, which will better prepare you for unassisted pull-ups.
The most common mistakes include relying too heavily on the assistance (using more than needed), kicking or swinging the legs for momentum, and not achieving full range of motion. Focus on controlled movement, fully extending your arms at the bottom, and bringing your chest to the bar at the top.
Progress varies based on consistency, starting strength, and body composition, but most people can transition to unassisted pull-ups within 2-6 months of regular training. Track your progress by gradually reducing assistance levels while maintaining good form and consistent rep ranges.
Scientific References
Scapula kinematics of pull-up techniques: Avoiding impingement risk with training changes.
Prinold JA, Bull AM · Journal of science and medicine in sport (2016)
Electromyographical Comparison of a Traditional, Suspension Device, and Towel Pull-Up.
Snarr RL, Hallmark AV, Casey JC et al. · Journal of human kinetics (2017)
Effect of two recovery methods on repeated closed-handed and open-handed weight-assisted pull-ups.
Bacon NT, Wingo JE, Richardson MT et al. · Journal of strength and conditioning research (2012)
Sources are peer-reviewed academic publications from PubMed.
Assisted Pull-Up
Thank you for your feedback!
Thank you for your feedback!