

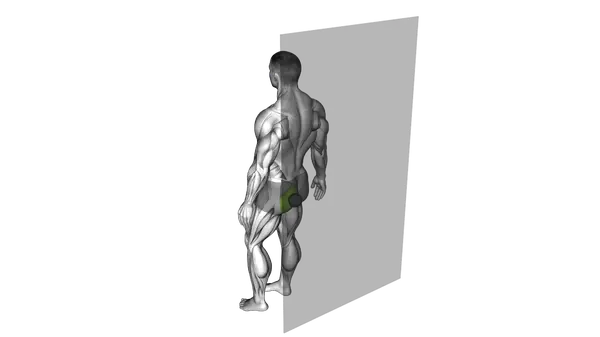
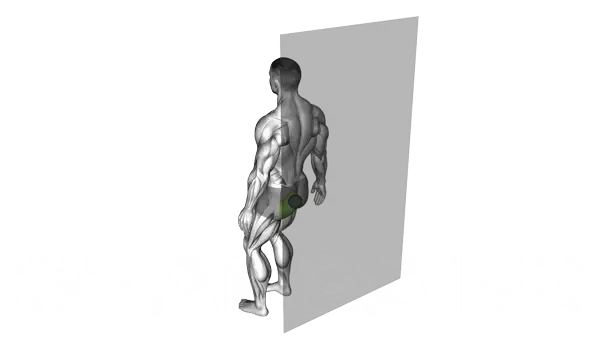
Glute Rolling With Ball
Muscles Worked: Glute Rolling With Ball
Glute Rolling With Ball mainly works your glutes because you place pressure into the ball and move across tight, sore spots in the muscles of your butt. Your abs help keep your body steady so you can control the rolling instead of collapsing onto the ball. This makes it more of a low-fatigue mobility drill than a strength move, but it can still help you relax stiff tissue and move better before or after training. You should feel deep pressure in the glutes, not sharp pain, and slow rolling usually works best for easing soreness and improving comfort with movement.
Technique and form
How to perform the Glute Rolling With Ball
- Place a foam roller or lacrosse ball on the floor and position yourself so that your gluteal muscles are directly on top of the ball.
- Gently lower your body weight onto the ball, supporting your upper body with your hands placed on the floor behind you.
- Bend your knees to approximately 90 degrees with your feet flat on the floor to create stability.
- Take a deep breath in, and as you exhale, begin to roll slowly across the targeted gluteal muscle, keeping your core engaged.
- When you find a tender spot or trigger point, pause and maintain pressure on that area for 20-30 seconds while continuing to breathe normally.
- Gradually increase the pressure by shifting more of your body weight onto the ball as your tolerance increases.
- Roll in multiple directions—forward, backward, and in small circular motions—to address different fibers within the muscle.
- After 1-2 minutes on one side, shift your position to target the other gluteal muscle and repeat the same rolling patterns.
Important information
- Avoid rolling directly on your tailbone or lower back—stay on the fleshy part of your glutes.
- If the pressure is too intense, place more weight on your supporting hand or foot to reduce the load on the ball.
- Keep your movements slow and controlled, allowing the tissues time to respond to the pressure.
- Drink plenty of water before and after rolling to help flush toxins released from the muscle tissue.
Does the Glute Rolling With Ball improve flexibility?
Yes. Glute Rolling With Ball can help improve flexibility and day-to-day movement quality by reducing stiffness in the glutes and making it easier to get into positions like squats, hinges, and lunges. It is not a big muscle-building exercise, but it can help you move through a better range of motion so your strength work feels smoother.
- Targets hard-to-reach tight spots — A ball gives more focused pressure than a foam roller, so you can work into small, tender areas in the glutes that often feel stiff after heavy leg training or long hours of sitting.
- Can improve hip comfort — When your glutes loosen up, it often feels easier to sit into lower-body moves without that blocked or pinchy feeling around the hips. That can make exercises like the barbell squat or dumbbell lunge feel cleaner.
- Low fatigue, easy recovery tool — This drill does not beat you up, so you can use it on rest days, before training as part of a warm-up, or after training to calm down tight muscles without adding much recovery cost.
- Best for movement prep, not muscle growth — Rolling can help you access better positions, but it does not replace loaded glute work. Use it to support your training, then build strength with full-range exercises that actually challenge the glutes.
Programming for flexibility
Do 1-3 sets of 30-60 seconds per side, resting 15-30 seconds between sides. Roll slowly and pause for 5-10 seconds on tight spots that feel sore but manageable. Use it 3-5 times per week, especially before lower-body sessions if your hips feel stiff, or after training if your glutes feel beat up.
Alternative Exercises


Built for progress
Take the guesswork out of training
Create personalized AI-powered workout plans that evolve with you. Train smarter, track every rep and keep moving forward, one workout at a time.


FAQ - Glute Rolling With Ball
Glute rolling primarily targets the gluteus maximus, medius, and minimus while engaging your core muscles as stabilizers. This technique effectively releases tension in the entire posterior chain, including areas that connect to your lower back and hamstrings.
Sit on a medium-firm ball (lacrosse or tennis ball) and place it directly under one glute muscle. Support yourself with hands behind you, then slowly roll across the muscle, pausing for 20-30 seconds on tender spots. Control pressure by adjusting how much body weight you place on the ball.
For optimal results, perform glute rolling 2-3 times weekly, either as part of your warm-up or post-workout recovery. Daily rolling can be beneficial during periods of intense training or when addressing specific mobility limitations, but allow muscles to recover if you experience prolonged soreness.
Yes, glute rolling can help alleviate lower back pain by releasing tension in the piriformis and gluteal muscles that often contribute to lower back issues. Regular rolling improves hip mobility and reduces compensatory patterns that place stress on the lumbar spine, though consult a healthcare provider for persistent pain.
The most common mistakes include rolling too quickly without allowing time for tissue release, using excessive pressure that causes pain rather than productive discomfort, and rolling directly on the tailbone or sciatic nerve path. Always move deliberately and adjust pressure to maintain control throughout the technique.
Glute Rolling With Ball
Thank you for your feedback!
Thank you for your feedback!