Lying Hip Lift (On Stability Ball)
The Lying Hip Lift is a controlled hip lift variation that challenges strength and stability while keeping the movement smooth and supported.


Lying Hip Lift (On Stability Ball)
Muscles Worked: Lying Hip Lift (On Stability Ball)
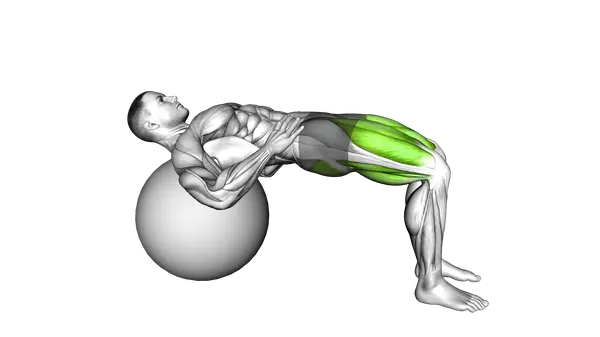
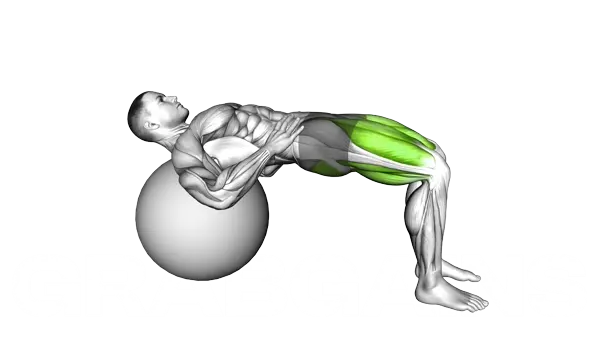
The Lying Hip Lift (On Stability Ball) mainly works your glutes, which drive your hips up and keep them extended at the top. Your hamstrings assist by pulling the ball in slightly and helping hold your hips high, which is why this move often feels tougher than a floor bridge. Your abs also work hard to stop your lower back from arching while the ball tries to roll away. You should feel your glutes doing most of the work, with the hamstrings helping strongly, and research shows stability-ball leg curl and bridge variations can produce substantial hamstring activation (Bourne et al., 2017).
Technique and form
How to perform the Lying Hip Lift (On Stability Ball)
- Position a stability ball under your feet and lie on your back with arms at your sides, palms facing down to stabilize your body.
- Place your heels on top of the ball with legs extended, keeping feet hip-width apart and toes pointing upward.
- Engage your core by drawing your navel toward your spine while maintaining a neutral position in your lower back.
- Exhale as you press through your heels and lift your hips off the ground until your body forms a straight line from shoulders to heels.
- At the top position, squeeze your glutes tightly while keeping your core engaged and shoulders firmly on the ground.
- Inhale as you slowly lower your hips back toward the floor in a controlled manner, stopping just before your lower back touches the ground.
- Maintain tension in your hamstrings and glutes throughout the movement, preventing the ball from rolling away.
- Complete the prescribed number of repetitions while focusing on a full range of motion and controlled movement speed.
Important information
- Keep your neck relaxed and head on the floor throughout the exercise to avoid unnecessary strain.
- If the exercise feels too challenging, place the ball closer to your body; for more difficulty, move the ball further away from your body.
- Make sure your hips rise high enough to create a straight line from shoulders to heels, but avoid hyperextending your back.
- For enhanced stability, place your arms slightly away from your body with palms pressing into the floor.
Is the Lying Hip Lift (On Stability Ball) good for muscle growth?
Yes. The Lying Hip Lift (On Stability Ball) can help build your glutes and hamstrings because it trains hard hip extension while forcing you to control a moving surface. Research on hamstring-focused exercise selection shows stability-ball leg curl patterns create high hamstring activation, which supports using this setup for muscle growth when you push sets close to failure (Bourne et al., 2017).
- Strong glute squeeze at the top — The best part of this exercise is the fully locked-out top position. When you drive your hips up and hold that straight line from shoulders to knees, your glutes stay under tension instead of getting a break at the bottom.
- More hamstring work than a basic bridge — Research on exercise selection shows stability-ball leg curl variations create high hamstring activation, which supports using ball-based bridge and curl patterns when bodyweight work starts feeling too easy (Bourne et al., 2017).
- Core tension is built in — The rolling ball forces you to brace the whole rep. That means your abs and deep trunk muscles work to keep your ribs down and your hips from wobbling, which helps you stay in a better position to load the glutes.
- Great bridge to harder posterior-chain work — This move teaches you to keep your hips up while your legs work, which carries over well to exercises like the Dumbbell Glute Bridge and Dumbbell Hip Thrust. If you struggle to feel your glutes in those lifts, this can help you learn the right squeeze.
Programming for muscle growth
Do 3-4 sets of 10-15 reps with 45-75 seconds rest, 2-3 times per week. Use higher reps because this exercise is limited more by control and burn than heavy loading. Stop each set when your hips start dropping or you feel your lower back taking over, since clean reps keep tension on the glutes and hamstrings where you want it.
Alternative Exercises


Built for progress
Take the guesswork out of training
Create personalized AI-powered workout plans that evolve with you. Train smarter, track every rep and keep moving forward, one workout at a time.


FAQ - Lying Hip Lift (On Stability Ball)
This exercise primarily targets your glutes and hamstrings while requiring significant core activation for stability. Your lower back, hip flexors, and abdominal muscles also work as important stabilizers throughout the movement.
When performed with proper form, this exercise can actually benefit those with lower back problems by strengthening supporting muscles without compressing the spine. Start with minimal range of motion and progress gradually, stopping immediately if you feel any pain rather than muscle fatigue.
The most common mistakes include lifting your chest off the bench to use momentum, shrugging your shoulders up toward your ears instead of pulling the shoulder blades back and down, pulling with bent wrists, and rushing the lowering phase. Focus on keeping your chest pressed against the pad, leading each rep by squeezing your shoulder blades together, and lowering the dumbbells under control to keep tension on the traps and rhomboid throughout the set.
For an easier version, place your feet wider apart on the ball or position the ball closer to your body. To increase difficulty, try performing the movement with one leg raised, holding a weight across your hips, or increasing time under tension by slowing down the movement.
Include this exercise 2-3 times per week with at least 24-48 hours of recovery between sessions targeting the same muscle groups. Start with 2-3 sets of 10-15 repetitions, focusing on quality movement rather than quantity.
Scientific References
Impact of exercise selection on hamstring muscle activation.
Bourne MN, Williams MD, Opar DA et al. · British journal of sports medicine (2017)
Sources are peer-reviewed academic publications from PubMed.
Lying Hip Lift (On Stability Ball)
Thank you for your feedback!
Thank you for your feedback!