Rear Decline Bridge
Reviewed by Dylan Maurick, Physiotherapist
The Rear Decline Bridge is a bodyweight glute exercise that increases hip extension demand by elevating the feet for more tension.


Rear Decline Bridge
Muscles Worked: Rear Decline Bridge
The Rear Decline Bridge mainly works your glutes, which drive your hips up and keep them locked out at the top. Your hamstrings assist by helping extend the hips, especially as your heels press into the support behind you. Your abs brace to stop your lower back from taking over and to keep your ribs and hips stacked. If you feel this more in your low back than your glutes and hamstrings, you likely need to tuck your hips slightly and keep the squeeze at the top honest; some bridge-style hip-extension exercises have been shown to create high hamstring involvement (Bourne et al., 2017).
Technique and form
How to perform the Rear Decline Bridge
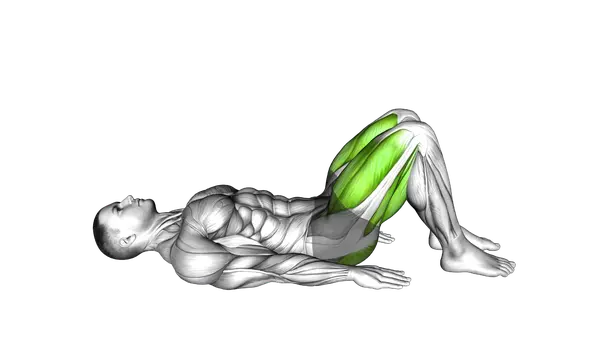
- Position yourself on the ground with your back facing a bench or stable surface, placing your hands on the ground beside your hips with fingers pointing toward your feet.
- Rest your heels on the bench with legs extended, keeping your body in a straight line from shoulders to heels.
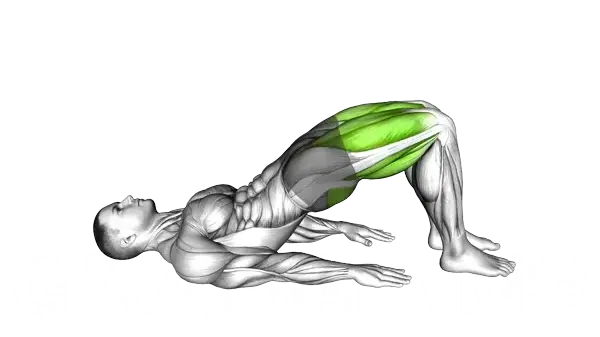
- Engage your core and press through your palms to lift your hips off the ground, creating a decline bridge position with your body forming a straight line from shoulders to heels.
- Squeeze your glutes at the top position while keeping your chin tucked slightly to maintain proper neck alignment.
- Breathe steadily throughout the movement, avoiding holding your breath which can increase internal pressure.
- Hold the elevated position for 1-2 seconds, focusing on keeping your hips high and body straight.
- Lower your body with control by bending your elbows until your glutes nearly touch the floor, maintaining tension in your core.
- Immediately press back up to the starting position, driving through your palms and keeping your shoulders pulled away from your ears.
Important information
- Keep your hips elevated throughout the exercise to avoid sagging in the middle, which can strain your lower back.
- Ensure the bench or surface is stable before beginning the exercise to prevent accidents or injuries.
- If you feel any wrist discomfort, try turning your hands slightly outward or using parallettes to create a more neutral wrist position.
- Begin with shorter hold times and fewer repetitions if you're new to this exercise, gradually increasing as your strength improves.
Is the Rear Decline Bridge good for muscle growth?
Yes. The Rear Decline Bridge can help build your glutes, especially if you slow the lowering phase, pause at the top, and train close to fatigue. It also brings in the hamstrings hard, which matters because studies comparing exercise selection show that some bridge-style hip extension variations can produce high hamstring activation (Bourne et al., 2017).
- Strong glute squeeze at lockout — The best part of this exercise is the top position. When you drive your hips up and finish with a hard glute squeeze, the glutes do the job they are meant to do: extend the hips without your lower back stealing the rep.
- More hamstring help than many people expect — Because your feet are elevated behind you, your hamstrings help a lot as you push through your heels and raise your hips. That makes this a useful bodyweight option when you want glute work with extra back-of-leg involvement, and some bridge-style variations have shown high hamstring activation in exercise comparisons (Bourne et al., 2017).
- Easy to make harder without equipment — You can add a 2-3 second pause at the top, lower yourself slowly, or move to single-leg bridge with outstretched leg. Those changes increase the challenge even when bodyweight alone starts to feel easy.
- Good bridge to loaded hip work — If you are learning how to use your glutes properly, this is a smart step before heavier moves like the dumbbell glute bridge. It teaches you to finish each rep with your hips, not by arching your back.
Programming for muscle growth
Do 3-4 sets of 10-20 reps with 45-75 seconds rest, 2-4 times per week. Higher reps work well here because bodyweight bridges are limited by load, so you often need more reps, slower lowering, or longer pauses to get close to fatigue. If you can do more than 20 clean reps easily, add a 2-3 second top squeeze or progress to a single-leg version.
Rear Decline Bridge Variations


Alternative Exercises


Built for progress
Take the guesswork out of training
Create personalized AI-powered workout plans that evolve with you. Train smarter, track every rep and keep moving forward, one workout at a time.


FAQ - Rear Decline Bridge
The Rear Decline Bridge primarily targets your posterior chain, with emphasis on the glutes and hamstrings. Your core muscles, including the erector spinae, also engage as stabilizers throughout the movement.
For an easier version, start with a standard floor bridge before progressing to the elevated position. To increase difficulty, extend one leg straight out during the bridge, add a resistance band above your knees, or increase time under tension by holding the top position for 3-5 seconds.
Yes, the Rear Decline Bridge is generally safe and potentially beneficial for those with lower back problems as it strengthens supporting musculature without directly loading the spine. However, maintain a neutral spine position throughout the movement and consult with a healthcare provider if you experience any pain.
For optimal results, include the Rear Decline Bridge 2-3 times per week, either as part of your lower body training days or as active recovery between more intense sessions. Aim for 2-3 sets of 10-15 repetitions, progressing to 20 reps as your strength improves.
The most common mistakes include hyperextending the lower back, lifting the hips too high, letting the knees cave inward, and forgetting to engage the core. Focus on driving through your heels, keeping knees tracking over toes, and maintaining a straight line from shoulders to knees at the top position.
Scientific References
Impact of exercise selection on hamstring muscle activation.
Bourne MN, Williams MD, Opar DA et al. · British journal of sports medicine (2017)
Sources are peer-reviewed academic publications from PubMed.
Rear Decline Bridge
Thank you for your feedback!
Thank you for your feedback!