Suspended Push Up
The Suspended Push Up is an advanced bodyweight exercise that increases difficulty by adding instability, forcing greater balance and full-body tension.


Suspended Push Up
Muscles Worked: Suspended Push Up
The Suspended Push Up mainly works your chest, because your pecs drive the pressing part and bring your arms toward the midline as you push your body away from the handles. Your triceps help straighten your elbows, while your shoulders assist and keep the top position strong. Because the straps move, your chest, triceps, shoulders, and core all have to work harder to keep you from wobbling. You should feel a hard chest squeeze plus extra tension through your arms and midsection when the straps stay steady (Calatayud et al., 2014).
Technique and form
How to perform the Suspended Push Up
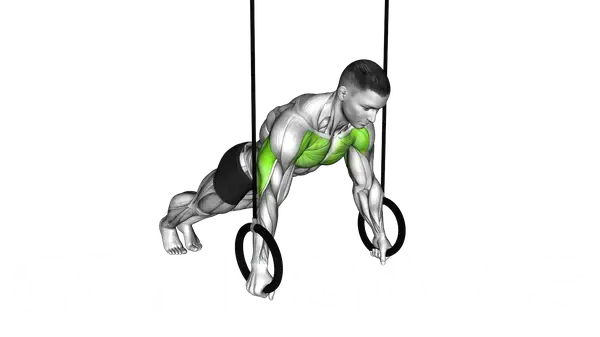
- Grasp the suspension trainer handles with palms facing down, and position yourself in a plank position with arms extended and feet on the floor.
- Align your body so that your shoulders are directly above your hands, creating a straight line from head to heels.
- Engage your core muscles by drawing your navel toward your spine, and squeeze your glutes to maintain a neutral spine position.
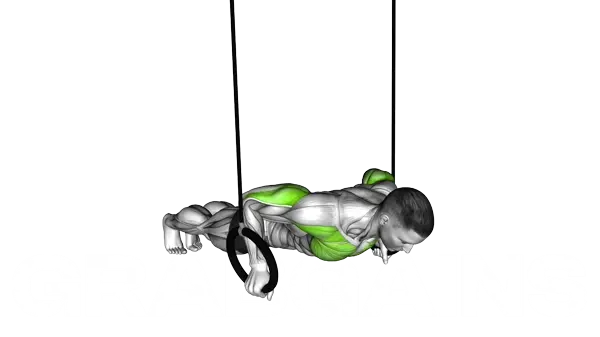
- Inhale as you slowly bend your elbows to lower your chest toward the handles, keeping your elbows at approximately a 45-degree angle from your torso.
- Maintain tension throughout your body, avoiding any sagging in your lower back or hiking of your hips as you descend.
- Lower until your chest is between the handles or until you feel a good stretch in your chest muscles, while keeping your head in a neutral position.
- Exhale forcefully as you push through your palms to extend your arms and return to the starting position.
- Stabilize at the top position momentarily before beginning the next repetition, maintaining full-body tension throughout the movement.
Important information
- Adjust the difficulty by changing your body angle, position your feet closer to the anchor point for an easier variation or further away for more challenge.
- Keep your wrists in a neutral position throughout the exercise to prevent strain.
- Make sure your shoulders stay away from your ears by actively pulling your shoulder blades down and back.
- If you feel any wrist or shoulder pain, try rotating the handles slightly inward to find a more comfortable position.
Is the Suspended Push Up good for muscle growth?
Yes. The Suspended Push Up can challenge the muscles hard enough to support growth if you are strong enough to train it hard, because the unstable straps increase muscle activation and stability demand in your chest, triceps, shoulders, and abs compared with a normal floor push-up (Syed-Abdul et al., 2018). A training study also found suspended push-up work increased muscle size in the upper body and even the abdominal muscles, which makes it more than just a balance challenge (Kohiruimaki et al., 2019).
- More tension from instability — The moving handles force you to control side-to-side shake on every rep, so your chest and triceps do not just press; they also keep the straps from drifting. That usually makes each rep feel harder than a regular push-up even without adding load.
- Extra abs work built in — Your midsection has to brace hard to stop your hips from sagging or twisting while the straps move. That added demand is one reason suspended push-up training has been shown to grow abdominal muscles alongside the upper body (Kohiruimaki et al., 2019).
- Big payoff for advanced lifters — If standard push-ups are too easy, suspension work gives you a tougher chest exercise without needing plates or machines. You can also raise your feet like a decline push-up to make the movement even more demanding.
- Strong lockout and shoulder control — The unstable setup makes the top half of the rep especially challenging, so your triceps and front delts have to finish each rep cleanly while keeping the handles lined up. That can expose weak points fast and gives you clear feedback when form slips.
Programming for muscle growth
Do 3-4 sets of 6-12 reps with 90-150 seconds rest. Train it 1-2 times per week, ideally after your main press or as your main bodyweight chest movement if regular push-ups are already easy. Stay 1-2 reps shy of failure so you can keep the straps under control, because sloppy reps turn this into a balance drill instead of a chest-building set.
Suspended Push Up Variations


Alternative Exercises


Built for progress
Take the guesswork out of training
Create personalized AI-powered workout plans that evolve with you. Train smarter, track every rep and keep moving forward, one workout at a time.


FAQ - Suspended Push Up
Suspended push-ups primarily target the pectorals, triceps, and anterior deltoids while significantly activating the core muscles, particularly the abdominals and serratus anterior. Research shows they generate 1.6 times greater abdominal activation than standard push-ups, making them excellent for building upper body strength and core stability simultaneously.
Beginners can increase body angle (feet closer to anchor point) or use a single suspension strap against a wall for support. Advanced lifters can progress by lowering the handles, adding a weight vest, elevating feet, or incorporating dynamic movements like atomic push-ups with knee tucks.
The three most common errors are sagging hips (fix by engaging your core throughout), flared elbows (keep them at 45° to protect shoulders), and unstable hand position (maintain consistent tension on the straps). Maintaining a rigid plank position from head to heels is essential for effectiveness and safety.
Include suspended push-ups 2-3 times weekly with at least 48 hours between sessions to allow for proper recovery. They can effectively replace traditional push-ups in any workout program and work well in strength routines (3-4 sets of 8-12 reps) or as a challenging component in HIIT circuits.
The instability of suspended push-ups can be therapeutic for some shoulder conditions by strengthening stabilizer muscles, but problematic for others. Start with a higher body angle to reduce loading, focus on proper form with elbows at 45°, and consult a physical therapist if you have existing shoulder injuries or chronic pain.
Scientific References
Suspended Push-up Training Augments Size of not only Upper Limb but also Abdominal Muscles.
Kohiruimaki R, Maeo S, Kanehisa H · International journal of sports medicine (2019)
Traditional Versus Suspended Push-up Muscle Activation in Athletes and Sedentary Women.
Syed-Abdul MM, Soni DS, Miller WM et al. · Journal of strength and conditioning research (2018)
Muscle Activation during Push-Ups with Different Suspension Training Systems.
Calatayud J, Borreani S, Colado JC et al. · Journal of sports science & medicine (2014)
Sources are peer-reviewed academic publications from PubMed.
Suspended Push Up
Thank you for your feedback!
Thank you for your feedback!