

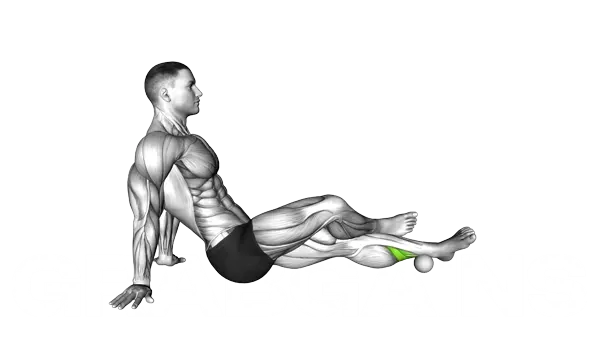
Tibialis Posterior with ball
Muscles Worked: Tibialis Posterior with ball
The Tibialis Posterior with ball mainly works the deep calf muscles that help support your arch and control how your foot rolls as you press into the ball. Your calves do the main work by keeping the ankle steady while the inside of the lower leg helps guide the foot into a stronger, more supported position. Because the ball adds pressure and a small balance challenge, the muscles around your foot have to stay switched on instead of letting the arch collapse. You should feel steady effort along the inside of the ankle and lower calf, not cramping in the toes, and higher weekly resistance-training volume can help promote calf muscle growth over time (Kassiano et al., 2024).
Technique and form
How to perform the Tibialis Posterior with ball
- Sit on a chair with your feet flat on the floor and position a small, firm ball under your mid-foot or arch area.
- Maintain an upright posture with your spine neutral and shoulders relaxed, placing your hands on your thighs for support.
- Press the inside edge of your foot down into the ball while keeping your heel and the ball of your foot in contact with the ground.
- Breathe normally as you apply pressure, focusing on activating the tibialis posterior muscle that runs along the inside of your lower leg.
- Hold the contracted position for 2-3 seconds while maintaining tension through the arch of your foot.
- Slowly release the pressure, returning to the starting position while maintaining control throughout the movement.
- Repeat for the prescribed number of repetitions before switching to the other foot, ensuring equal work on both sides.
- As you progress, increase the duration of the contraction or the firmness of the ball to add resistance.
Important information
- Keep your toes relaxed and avoid curling them during the exercise, as this may recruit other foot muscles instead of targeting the tibialis posterior.
- Make sure your knee stays aligned with your foot throughout the movement to prevent unnecessary stress on the knee joint.
- If you experience any sharp pain (rather than the normal feeling of muscle work), stop immediately and reassess your technique or consult with a professional.
- For better results, perform this exercise barefoot to maximize proprioception and muscle activation in the foot.
Is the Tibialis Posterior with ball good for muscle growth?
Yes. The Tibialis Posterior with ball can help build strength and size in the lower leg, but its bigger value is improving foot control and arch support while giving the calf area low-fatigue work. Calf research suggests that doing enough weekly calf training volume and progressing it over time can help support muscle growth (Kassiano et al., 2024).
- Arch support under load — Pressing into the ball teaches you to keep the inside of the foot active instead of letting it flatten. That makes this drill useful for lifters whose feet cave in during standing calf raises or squats.
- Low-fatigue calf work — This exercise does not beat you up like heavy calf raises, so you can add it after bigger leg work to build strength where your foot and ankle usually give out first. That matters because higher weekly calf training volume can help drive calf growth (Kassiano et al., 2024).
- Better foot position carryover — Small changes in foot angle can shift which part of the calf gets more growth stimulus in calf training (Nunes et al., 2020). This drill helps you learn a cleaner foot position before loading moves like the standing calf raise.
- Useful with heavier calf training — Think of it as a support exercise, not your only calf builder. Use it to improve control, then load patterns like the seated calf raise harder and more safely.
Programming for muscle growth
Do 2-4 sets of 10-20 reps per side with 30-60 seconds rest, 2-4 times per week. Use slow reps and a brief squeeze in the strongest position so the foot muscles actually work instead of the toes taking over. Start on the lower end if your feet cramp easily, then add reps, longer pauses, or slightly more pressure into the ball over time.
Alternative Exercises


Built for progress
Take the guesswork out of training
Create personalized AI-powered workout plans that evolve with you. Train smarter, track every rep and keep moving forward, one workout at a time.


FAQ - Tibialis Posterior with ball
This exercise primarily targets the tibialis posterior muscle, which runs along the inner portion of your lower leg behind the shin bone. It also engages other deep calf muscles and helps activate the intrinsic foot muscles that support your arch.
Aim to incorporate this exercise 2-3 times per week, either as part of your warm-up routine or as a standalone recovery session. For maintenance, 2-3 sets of 30-60 seconds per leg is typically sufficient.
Yes, when performed correctly, this exercise can actually help alleviate plantar fasciitis by strengthening the muscles that support your foot arch. Start gently with light pressure and shorter durations, increasing gradually as comfort allows.
A small therapy ball or lacrosse ball (2-3 inches in diameter) works best. The ball should be firm enough to apply pressure but have some give to avoid discomfort. Softer balls are recommended for beginners, while firmer options provide more intense release.
The most common mistakes include rushing through the movement, using momentum instead of controlled motion, and forcing rotation beyond your comfortable range. Keep the movement slow and deliberate, breathe throughout the exercise, and never push through sharp or shooting pain.
Scientific References
Nunes JP, Costa BDV, Kassiano W et al. · Journal of strength and conditioning research (2020)
Bigger Calves from Doing Higher Resistance Training Volume?
Kassiano W, Costa BDV, Kunevaliki G et al. · International journal of sports medicine (2024)
Sources are peer-reviewed academic publications from PubMed.
Tibialis Posterior with ball
Thank you for your feedback!
Thank you for your feedback!