Bench Dip with heels on Floor
Reviewed by Dylan Maurick, Physiotherapist
The Bench Dip with Heels on Floor is a bodyweight exercise used to build tricep strength while keeping the legs grounded for stability.


Bench Dip with heels on Floor
Muscles Worked: Bench Dip with heels on Floor
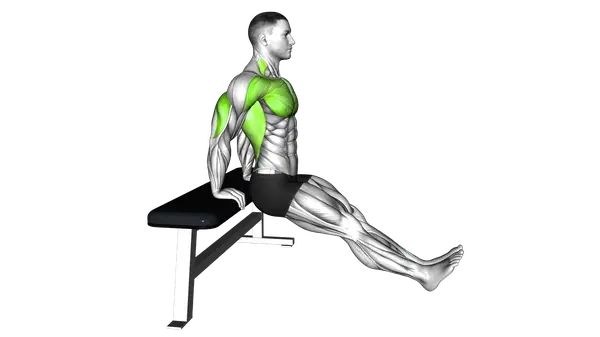
Bench dips with your heels on the floor mainly train your arms, especially the triceps, because your elbows straighten to press your body back up. Your chest helps by bringing your upper arms in and adding extra push at the bottom. Your front shoulders assist through the rep and help keep the shoulder joint steady as your body moves in front of the bench. You should feel the triceps doing most of the work, and if your shoulders feel pinchy, the setup is likely too deep or too loose for your current control.
Technique and form
How to perform the Bench Dip with heels on Floor
- Sit on the edge of a bench or sturdy chair, placing your hands beside your hips with fingers pointing forward and gripping the edge.
- Extend your legs straight out in front of you with your heels planted firmly on the floor, creating a straight line from your heels to your head.
- Slide your hips forward off the bench while supporting your body weight with your hands, maintaining the heel-planted position.
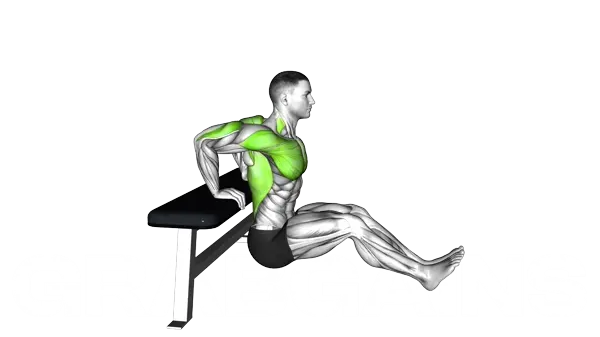
- Inhale as you slowly lower your body by bending your elbows, keeping them pointing directly behind you (not flaring outward).
- Lower until your elbows reach about 90 degrees or until you feel a good stretch in your triceps and shoulders.
- Exhale as you press through your palms to straighten your arms, returning to the starting position with control
- Keep your shoulders pulled back and down away from your ears throughout the exercise to reduce neck strain and maximize tricep engagement.
- Maintain a strong core by drawing your navel toward your spine, preventing excessive lower back arching.
Important information
- Keep your elbows pointing directly behind you, not flaring outward, to maximize triceps engagement and protect your shoulders.
- Position your hands shoulder-width apart or slightly wider for optimal stability and to prevent wrist strain.
- Keep your heels planted on the floor throughout the entire movement - do not lift your feet or bend your knees.
- If you experience wrist discomfort, try using push-up handles or gripping the bench with a slightly wider hand position.
- For beginners, keep the movement controlled and focus on form; advanced practitioners can add weight by placing a plate on their lap.
- Your body should move in a straight vertical path - avoid drifting too far forward or backward during the movement.
Is the Bench Dip with heels on Floor good for muscle growth?
Yes. Bench dips with your heels on the floor can build muscle in the triceps and chest because you move your full bodyweight through a long range, and that gives you plenty of tension when sets are pushed close to failure. Pressing performance also holds up better when rest periods are long enough, which matters if you want later sets to stay productive for muscle growth.
- Bodyweight still loads the triceps hard — Even without added weight, your triceps have to straighten the elbows against a large share of your bodyweight. That makes this a useful option when you want more arm work but do not have access to bars or machines.
- Heel position changes the difficulty — Keeping the heels on the floor gives you assistance from the legs, so you can fine-tune effort by bending the knees more for help or straightening the legs more to make each rep tougher. That makes it easier to stay in a rep range that actually grows muscle instead of turning every set into a grind.
- The bottom stretch can boost chest involvement — As your body lowers, your chest helps more because your upper arms move behind your torso and then drive back in as you press up. If you want a similar bodyweight press with a different feel, compare it with Weighted Tricep Dips, which usually let stronger lifters keep progressing longer.
- Rest length affects rep quality — Short rest can make pressing reps fall off fast, which means less quality work by the end of the session. For harder sets on bench dips, resting about 2 minutes is usually smarter than rushing, since longer inter-set rest improves pressing performance in trained men and women.
Programming for muscle growth
Do 3-4 sets of 8-15 reps, resting 90-120 seconds between sets, 1-3 times per week. Use a range that lets you lower under control and press back up without shoulder discomfort. When you can hit 15 clean reps on all sets, make it harder by straightening the legs more, slowing the lowering phase, or moving to Weighted Tricep Dips.
Alternative Exercises


Built for progress
Take the guesswork out of training
Create personalized AI-powered workout plans that evolve with you. Train smarter, track every rep and keep moving forward, one workout at a time.


FAQ - Bench Dip with heels on Floor
The Bench Dip with Heels on Floor primarily targets your triceps (the muscles on the back of your arms), while also working your chest and front shoulders. It's excellent for building stronger, more defined arms and improving your pushing strength for everyday activities.
Beginners can bend their knees more or use a lower surface to reduce difficulty. You can also do smaller range of motion until you build strength. Advanced users can add weight by placing a plate or dumbbell on their lap, or use a higher bench to increase the challenge.
This exercise can be hard on shoulders if you have existing problems or go too low. If you have shoulder issues, start with a very small range of motion and stop if you feel pain. Consider alternatives like wall push-ups or tricep extensions until your shoulders are healthier. Always consult a healthcare professional if you're unsure.
The biggest mistakes are letting your elbows flare out to the sides (keep them pointing straight back), going too low too quickly, and not keeping your heels planted on the floor. Also avoid hunching your shoulders forward - keep them pulled back and down throughout the movement.
Beginners should start with 2-3 sets of 8-12 reps, focusing on good form. As you get stronger, you can work up to 3-4 sets of 12-20 reps. If you can easily do 20 reps, it's time to add weight or try a more challenging variation.
Bench Dip with heels on Floor
Thank you for your feedback!
Thank you for your feedback!