Diamond Push Up
Reviewed by Dylan Maurick, Physiotherapist
The Diamond Push Up is a bodyweight push-up variation that increases tricep focus by placing the hands close together under the chest.


Diamond Push Up
Muscles Worked: Diamond Push Up
The Diamond Push Up mainly works your chest, but the close hand position shifts more of the load to your triceps as you press your body away from the floor. Your front shoulders help drive the rep, especially near the bottom when your elbows bend deeply. Your abs and glutes also brace hard to keep your body straight so your hips do not sag. You should feel your inner chest and triceps doing most of the work, and longer rest periods usually help you keep rep quality higher across hard pressing sets.
Technique and form
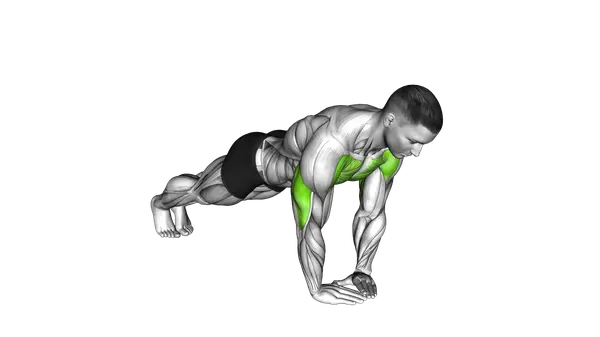
How to perform the Diamond Push Up
- Begin in a plank position with your hands directly under your shoulders, fingers pointing forward and arms fully extended.
- Bring your hands close together under your chest so your thumbs and index fingers touch to form a diamond or triangle shape.
- Keep your body in a straight line from head to heels by engaging your core and glutes, avoiding any sagging or pike in your hips.
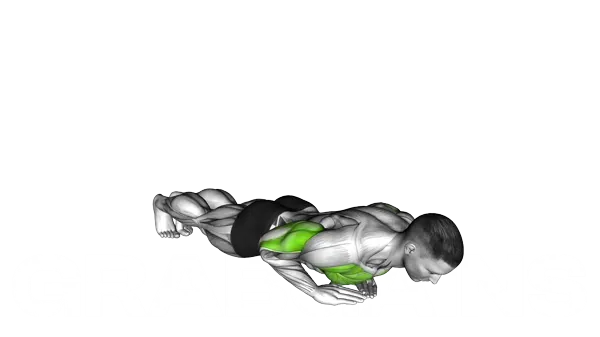
- Inhale as you slowly lower your chest toward your hands by bending your elbows, keeping them tucked close to your sides rather than flaring outward.
- Continue lowering until your chest nearly touches the diamond formed by your hands, while maintaining tension throughout your entire body.
- Exhale forcefully as you push through your palms to straighten your arms and return to the starting position.
- Keep your neck neutral throughout the movement by focusing your gaze slightly ahead of your hands rather than looking up or down.
- Complete the desired number of repetitions while maintaining proper form, slowing down the movement if needed to ensure quality over quantity.
Important information
- Make sure your elbows track backward at approximately a 45-degree angle to your torso to reduce shoulder strain, avoiding excessive flaring.
- If the exercise is too challenging, modify by performing it from your knees while maintaining the same rigid body alignment from knees to shoulders.
- Keep your wrists stacked directly under the heel of your palm to prevent unnecessary strain on the joint.
- Avoid excessive forward head posture by imagining a broomstick along your spine from your head to your tailbone.
Is the Diamond Push Up good for muscle growth?
Yes. The Diamond Push Up can build muscle in your chest, triceps, and front shoulders because it is a hard bodyweight press that lets you take sets close to failure, which is what drives growth. It is especially useful if you want a push-up variation that makes your triceps work harder, and keeping enough rest between tough sets helps you hold onto performance.
- More triceps stress — Bringing your hands close together shortens your base and makes elbow straightening a bigger part of each rep, so your triceps have to contribute more than in a standard push-up. That makes this a smart pick when regular push-ups stop challenging the back of your arms.
- Strong chest stimulus without equipment — Your pecs still do the main job of bringing your arms in and pushing your body up. If you lower all the way until your chest is just above the floor, you give your chest a better growth signal than doing short, half reps.
- Easy to progress with bodyweight — You can make this movement harder by slowing the lowering phase, pausing at the bottom, adding reps, or moving to a decline-push-up. That gives you clear ways to apply progressive overload even without weights.
- Pairs well with direct triceps work — The Diamond Push Up trains the triceps in a tucked arm position, but research shows triceps growth can be even greater when elbow work is also done with the arms overhead (Maeo et al., 2023). In practice, that means this exercise works well alongside overhead triceps work, not just as a standalone arm builder.
Programming for muscle growth
Do 3-5 sets of 6-15 reps, resting 90-150 seconds between sets. Train it 1-3 times per week depending on how much other pressing you do. Use the lower end of the rep range if diamond push-ups are very hard for you, and use the higher end if you are chasing a bigger pump and cleaner reps. Stop each set with 0-2 reps left in the tank so the set is hard enough to drive growth without your form falling apart.
Diamond Push Up Variations
")


Alternative Exercises


Built for progress
Take the guesswork out of training
Create personalized AI-powered workout plans that evolve with you. Train smarter, track every rep and keep moving forward, one workout at a time.


FAQ - Diamond Push Up
Diamond push-ups primarily target the triceps brachii (back of arms), with significant activation of the chest (pectoralis major) and front shoulder muscles (anterior deltoids). Research shows they create up to 2.5 times more triceps activation than standard push-ups.
Beginners can perform diamond push-ups from the knees rather than toes, which reduces the resistance by approximately 40%. Alternatively, you can elevate your hands on a stable surface like a bench or step to decrease the difficulty while maintaining proper form.
The narrow hand position can increase stress on wrists and elbows compared to standard push-ups. Ensure your wrists align directly under your shoulders, avoid flaring elbows past 45 degrees, and consider wrist stretches before starting. If you have existing joint issues, consult with a physical therapist before attempting.
For strength development, aim for 3-4 sets of 8-12 repetitions with proper form. If incorporating them into HIIT circuits, 30-45 second work periods are effective. Progress gradually by adding 1-2 repetitions each week rather than sacrificing technique for higher numbers.
The three most common mistakes are: allowing the hips to sag (which strains the lower back), positioning hands too far forward (creating excessive wrist strain), and not lowering to proper depth. Keep your core engaged throughout the movement and aim to touch your chest to your hands at the bottom position.
Scientific References
Maeo S, Wu Y, Huang M et al. · European journal of sport science (2023)
Sources are peer-reviewed academic publications from PubMed.
Diamond Push Up
Thank you for your feedback!
Thank you for your feedback!